# ___ USING BashOperator
run_this = BashOperator(
    task_id="run_after_loop",
    bash_command="ls -alh --color=always / && echo https://airflow.apache.org/
        && echo 'some <code>html</code>'",
)

#____  SAME as above but USING @task.bash
@task.bash
def run_after_loop() -> str:
    return "echo 1"

run_this = run_after_loop()DAG
Overview
Apache documentation can be found on this Page
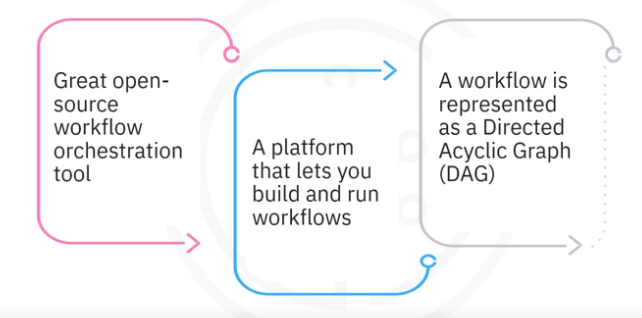
Apache Airflow is a platform to programmatically author, schedule and monitor workflows. It is a platform that lets you build and run workflows.
AA Architecture
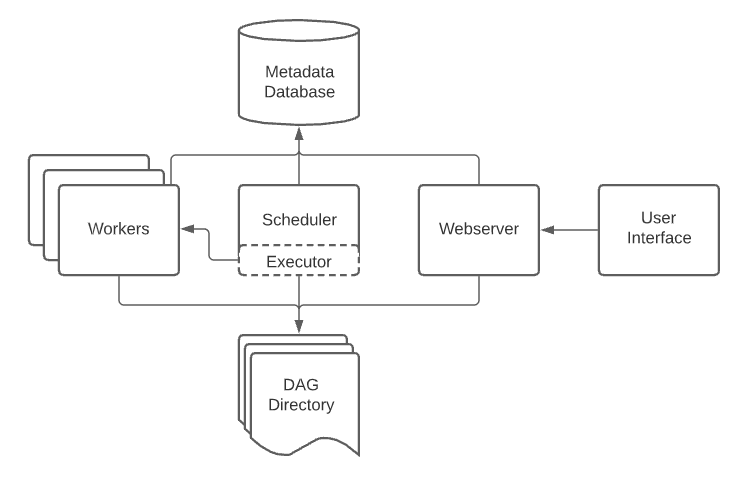
Airflow comes with a built-in
- Scheduler, which handles the triggering of all scheduled workflows. The scheduler is responsible for submitting individual tasks from each scheduled workflow to the executor.
- Executor handles the running of these tasks by assigning them to workers
- Workers who then run the tasks.
- Web server component of the Airflow provides a user-friendly, graphical user interface.
- UI where you can inspect, trigger, and debug any of your DAGs and their individual tasks.
- DAG directory contains all of your DAG files, ready to be accessed by the scheduler, the executor, and each of its employed workers.
- Metadata database, which is used by the scheduler, executor, and the web server to store the state of each DAG and its tasks.
Features
The five main features and benefits of Apache Airflow.
- Pure Python
- Create your workflows using standard Python. This allows you to maintain full flexibility when building your data pipelines.
- Useful UI
- provides the ability to monitor the workflow, schedule the workflow, or manually run it, and manage the workflows via a sophisticated web app, offering you full insight into the status of your tasks.
- Integration
- Apache Airflow provides many plug-and-play integrations, such as IBM data band that helps achieve continuous observability and monitoring.
- Easy to use
- A workflow is easy to create and deploy for anyone with prior knowledge of Python. The Airflow pipeline can combine many tasks created with many options of operators and sensors without any limits. Airflow does not limit the scope of your pipelines.
- Open source
- Whenever you want to share your improvement, you can do this by opening a pull request.
Principles
Apache Airflow pipelines are built on four main principles:
- Scalable.
- Airflow has a modular architecture and uses a message queue to orchestrate an arbitrary number of workers. It is ready to scale to infinity.
- Dynamic.
- Airflow pipelines are defined in Python, and allow dynamic pipeline generation. Thus, your pipelines can contain multiple simultaneous tasks.
- Extensible.
- You can easily define your own operators and extend libraries to suit your environment.
- Lean.
- Airflow pipelines are lean and explicit. Parameterization is built into its core using the powerful Jinja templating engine.

With AA, a workflow is represented as a Directed Acyclic Graph (DAG)
- Graph - Nodes and Edges
- Nodes are tasks
- Tasks run in order
- Edges are dependencies
- Nodes are tasks
- Directed graph - Each edge has a direction
- Acyclic - No loops (or cycles)
A DAG (Directed Acyclic Graph) is the core concept of Airflow, collecting Tasks together, organized with dependencies and relationships to say how they should run.
A DAG is defined in a Python script, which represents the DAG structure, thus, the tasks and their dependencies are defined as code. Also, scheduling instructions are specified as code in the DAG script

Tasks
A Task is the basic unit of execution in Airflow. Tasks are arranged into DAGs, and then have upstream and downstream dependencies set between them in order to express the order they should run in. Just like the DAG itself, each task performed within your DAG is also written in Python.
Task kinds
There are three basic kinds of Task:
- Operators, predefined task templates that you can string together quickly to build most parts of your DAGs.
- Operators are used to define what each task in your DAG does.
- Sensors, a special subclass of Operators which are entirely about waiting for an external event to happen.
- Sensors are a class of operators which are used to poll for a certain time or condition to be met.
- For example a sensor can check every 30 seconds whether a file exists or whether another DAG has finished running.
- A TaskFlow-decorated
@task, which is a custom Python function packaged up as a Task.
Internally, these are all actually subclasses of Airflow’s BaseOperator, and the concepts of Task and Operator are somewhat interchangeable, but it’s useful to think of them as separate concepts - essentially, Operators and Sensors are templates, and when you call one in a DAG file, you’re making a Task.
Operators
Airflow offers a wide range of operators, including many that are built into the core or are provided by pre-installed providers. Some popular core operators include:
BashOperator- executes a bash commandPythonOperator- calls an arbitrary Python functionEmailOperator- sends an email
BashOperator
More information can be found on Apache Airflow documentation page.
Use the BashOperator to execute commands in a Bash shell. The Bash command or script to execute is determined by:
- The
bash_commandargument when usingBashOperator, or - If using the TaskFlow decorator,
@task.bash, a non-empty string value returned from the decorated callable. - The
@task.bashdecorator is recommended over the classicBashOperatorto execute Bash commands. - Using the
@task.bashTaskFlow decorator allows you to return a formatted string and take advantage of having all execution context variables directly accessible to decorated tasks.
BaseBranchOperator
The other core operators available include:
BaseBranchOperator - A base class for creating operators with branching functionality
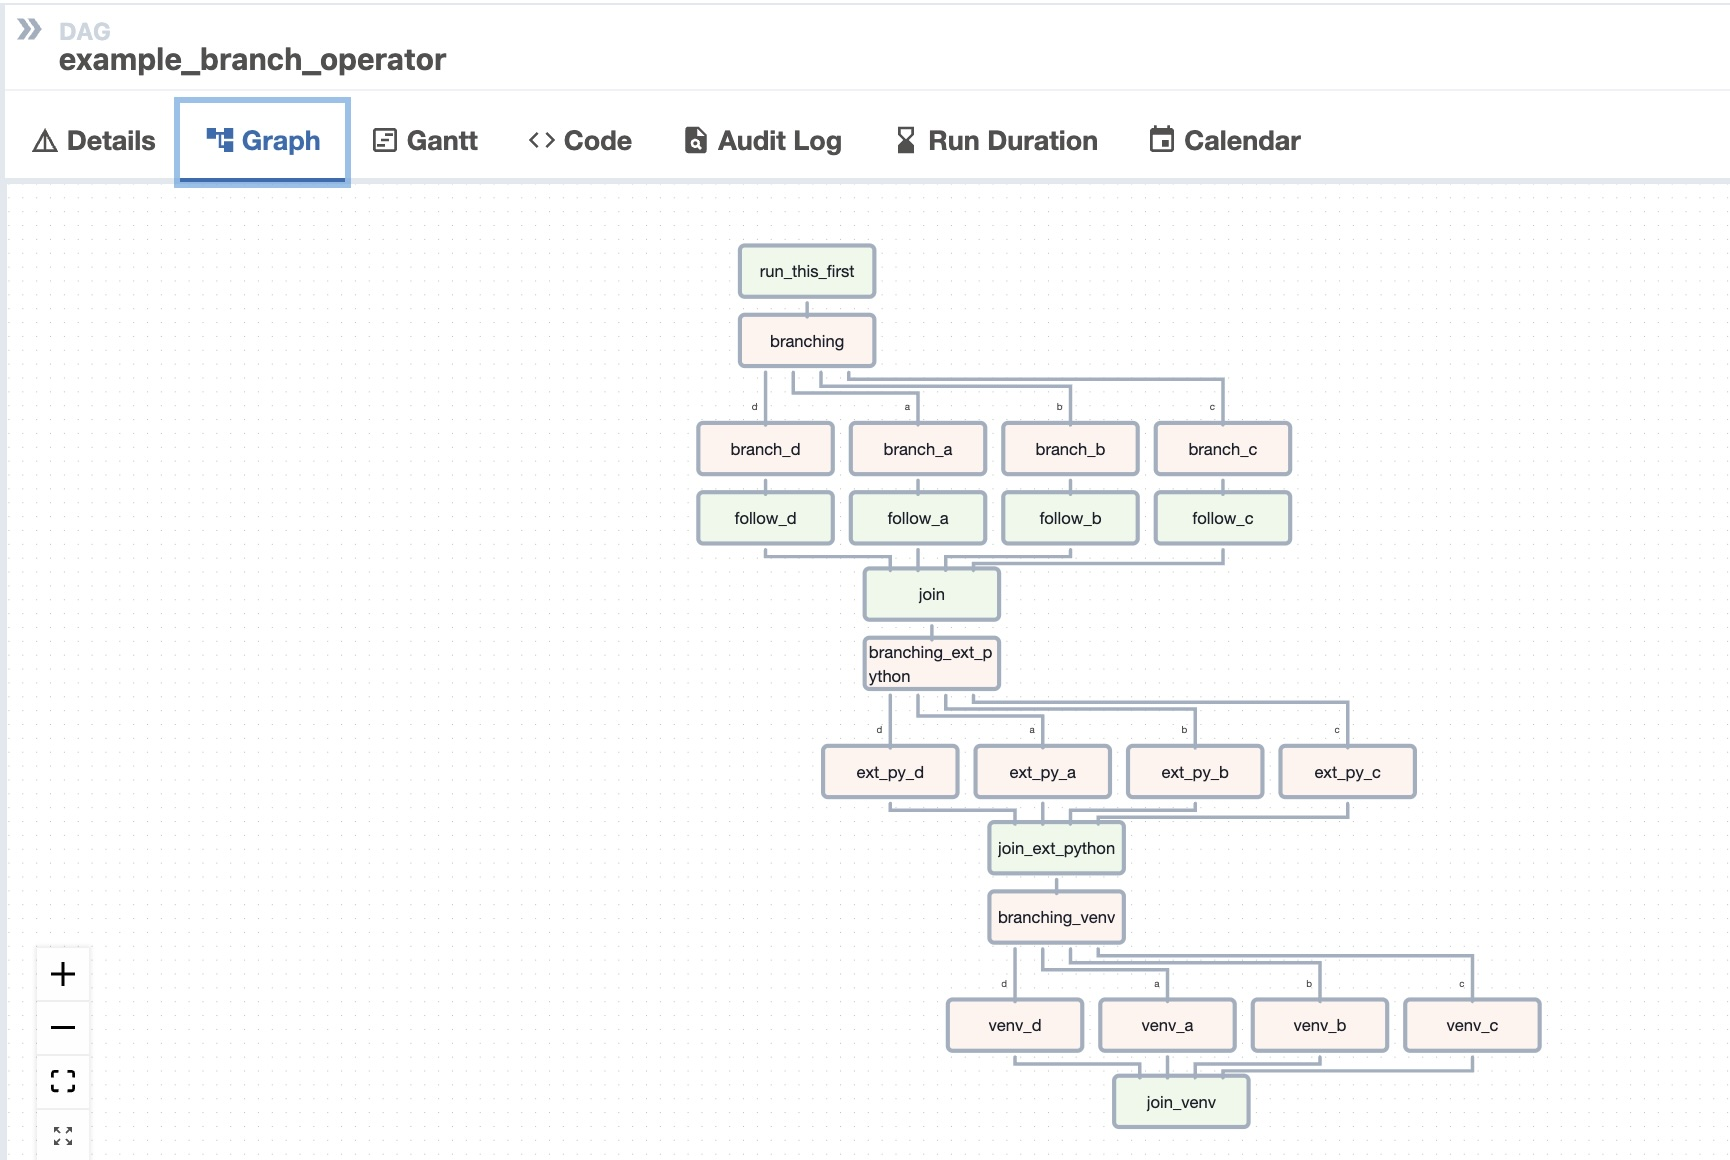
BranchDateTimeOperator
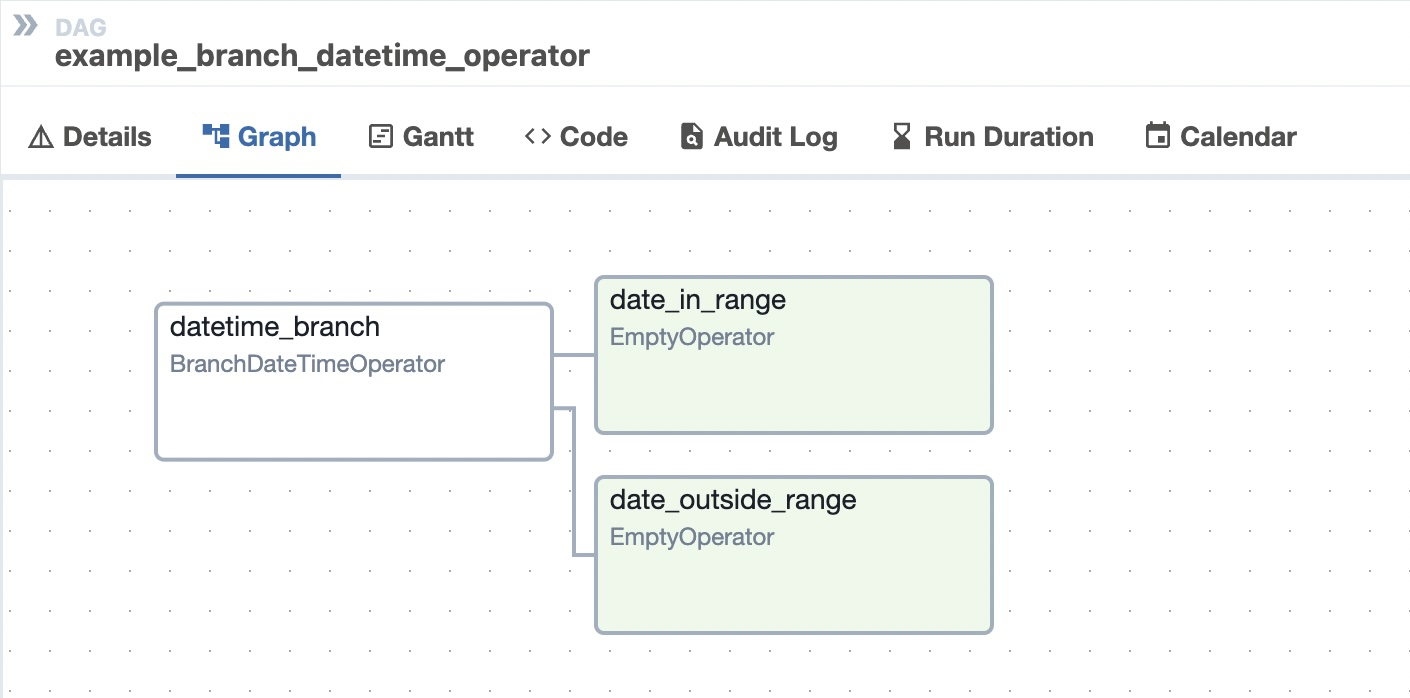
BranchDateTimeOperator- used to branch into one of two execution paths depending on whether the time falls into the range given by two target argumentsEmptyOperator- Operator that does nothingGenericTransfer- Moves data from on database connection to another.LatestOnlyOperator- Skip tasks that are not running during the most recent schedule interval.TriggerDagRunOperator- Triggers a DAG run for a specified dag_id.
Besides these, there are also many community provided operators. Some of the popular and useful ones are:
HttpOperatorMySqlOperatorPostgresOperatorMsSqlOperatorOracleOperatorJdbcOperatorDockerOperatorHiveOperatorS3FileTransformOperatorPrestoToMySqlOperatorSlackAPIOperator
Dependencies
The key part of using Tasks is defining how they relate to each other - their dependencies, or as we say in Airflow, their upstream and downstream tasks.
- You declare your Tasks first, and then you declare their dependencies second.
A Task/Operator does not usually live alone; it has dependencies on other tasks (those upstream of it), and other tasks depend on it (those downstream of it). Declaring these dependencies between tasks is what makes up the DAG structure (the edges of the directed acyclic graph).
Upstream
The upstream task the one that is directly preceding the other task. Be aware that this concept does not describe the tasks that are higher in the tasks hierarchy (i.e. they are not a direct parents of the task).
Downstream
Same definition applies to downstream task, which needs to be a direct child of the other task.
Declaring
Use the bitshift >> operators:
first_task >> second_task >> [third_task, fourth_task]or the more explicit set_upstream and set_downstream methods:
first_task.set_downstream(second_task)
third_task.set_upstream(second_task)
Task example
The tasks themselves describe what to do. In this example DAG,

the tasks include
- data ingestion
- data analysis
- saving the data
- generating reports
- and triggering other systems
- such as reporting any errors by email.
Here is how the lifecycle of an AA task state might look like:
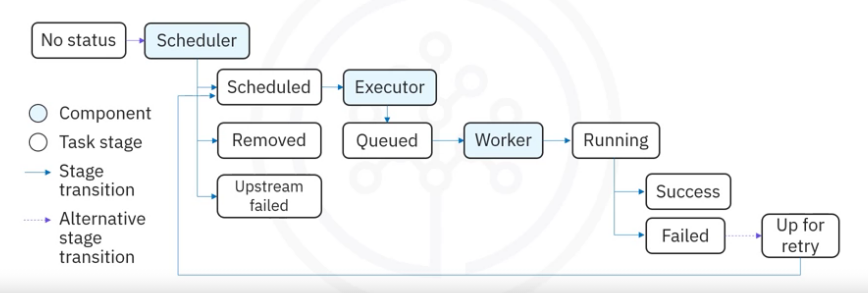
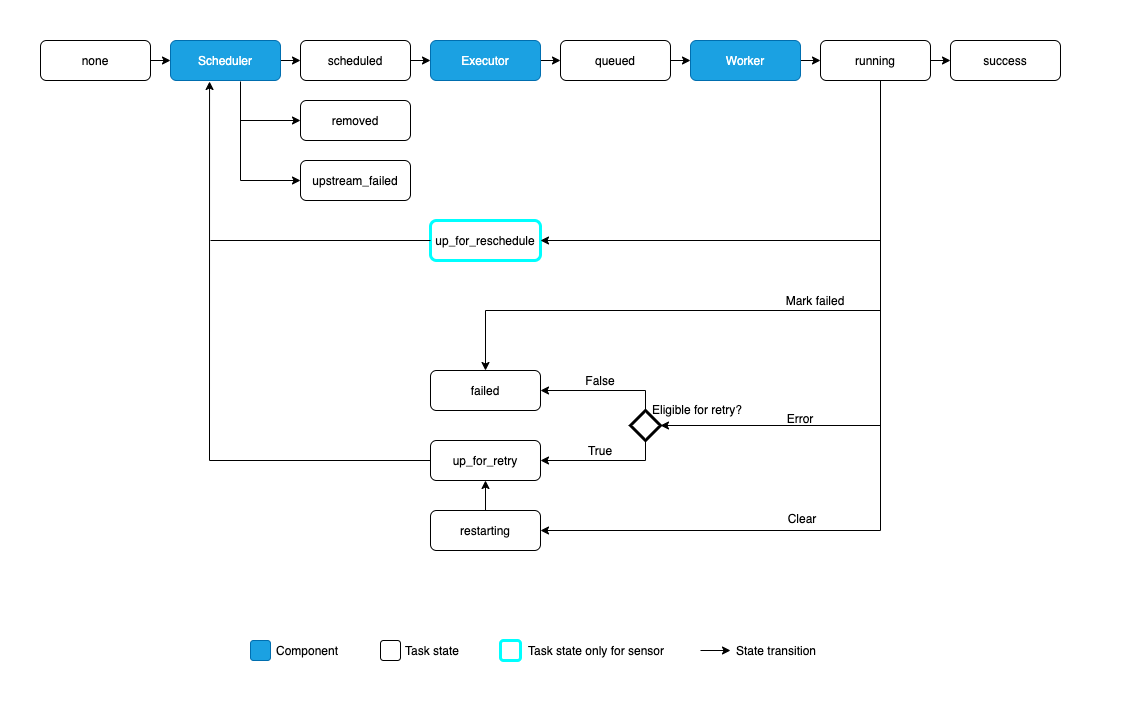
AA might assign these possible states to a task during its lifecycle:
none: The Task has not yet been queued for execution (its dependencies are not yet met)scheduled: The scheduler has determined the Task’s dependencies are met and it should runqueued: The task has been assigned to an Executor and is awaiting a workerrunning: The task is running on a worker (or on a local/synchronous executor)success: The task finished running without errorsrestarting: The task was externally requested to restart when it was runningfailed: The task had an error during execution and failed to runskipped: The task was skipped due to branching, LatestOnly, or similar.upstream_failed: An upstream task failed and the Trigger Rule says we needed itup_for_retry: The task failed, but has retry attempts left and will be rescheduled.up_for_reschedule: The task is a Sensor that is inreschedulemodedeferred: The task has been deferred to a triggerremoved: The task has vanished from the DAG since the run started
Ideally, a task should flow throughout the scheduler from no status, to scheduled, to queued, to running, and finally to success.
Create DAG
An Apache Airflow DAG is a Python script consisting of the following logical blocks;
- Library imports
- DAG arguments
- DAG definition
- Task definitions
- Task pipeline
Import
- The first block of your DAG definition script is where you import any Python libraries that you require, for example, the from Airflow import DAG command to import the DAG module from the airflow collection.
# import the libraries
from datetime import timedelta

# The DAG object; we'll need this to instantiate a DAG
from airflow.models import DAG

# Operators; you need this to write tasks!
from airflow.operators.bash_operator import BashOperator
from airflow.operators.python import PythonOperator
from airflow.operators.email import EmailOperator
DAG Arguments
- Next block of code is for specifying default arguments for your DAG, such as its default start date.
- DAG arguments are like the initial settings for the DAG.
- The below settings mention:
'owner'- The owner name'start_date'- When this DAG should run from: days_ago(0) means today'email'- The email address where the alerts are sent to'retries'- The number of retries in case of failure'retry_delay'- The time delay between retries
- The other options that you can include are:
'queue': The name of the queue the task should be a part of'pool': The pool that this task should use'email_on_failure': Whether an email should be sent to the owner on failure'email_on_retry': Whether an email should be sent to the owner on retry'priority_weight': Priority weight of this task against other tasks.'end_date': End date for the task'wait_for_downstream': Boolean value indicating whether it should wait for downtime'sla': Time by which the task should have succeeded. This can be a timedelta object'execution_timeout': Time limit for running the task. This can be a timedelta object'on_failure_callback': Some function, or list of functions to call on failure'on_success_callback': Some function, or list of functions to call on success'on_retry_callback': Another function, or list of functions to call on retry'sla_miss_callback': Yet another function, or list of functions when ‘sla’ is missed'on_skipped_callback': Some function to call when the task is skipped'trigger_rule': Defines the rule by which the generated task gets triggered
# defining DAG arguments
# You can override them on a per-task basis during operator initialization
default_args = {
    'owner': 'Your name',
    'start_date': days_ago(0),
    'email': ['youemail@somemail.com'],
    'retries': 1,
    'retry_delay': timedelta(minutes=5),
}
DAG Definitions
- Next comes the DAG definition or instantiation block for your DAG, which specifies things like your default arguments.
- Below you are creating a variable named dag by instantiating the DAG class with the following parameters:
unique_id_for_DAGis the ID of the DAG. This is what you see on the web console. This is what you can use to trigger the DAG using aTriggerDagRunOperator- You are passing the dictionary
default_args, in which all the defaults are defined: descriptionhelps us in understanding what this DAG doesschedule_intervaltells us how frequently this DAG runs. In this case every day. (days=1).
# define the DAG
dag = DAG(
    dag_id='unique_id_for_DAG',
    default_args=default_args,
    description='A simple description of what the DAG does',
    schedule_interval=timedelta(days=1),
)
Task Definitions
- The tasks can be defined using any of the operators that have been imported.
- Then the individual task definitions, which are the nodes of the DAG, form your DAGs next building block.
- In this example, A task is defined using:
- A
task_idwhich is a string that helps in identifying the dag this task belongs to - The actual task to be performed
- The bash command it represents in case of
BashOperator - The Python callable function in case of a
PythonOperator - Details of the sender, subject of the mail and the mail text as HTML in case of
EmailOperator
- The bash command it represents in case of
- A
# define the tasks
# define a task with BashOperator
task1 = BashOperator(
    task_id='unique_task_id',
    bash_command='<some bashcommand>',
    dag=dag,
)
# define a task with PythonOperator
task2 = PythonOperator(
    task_id='bash_task',
    python_callable=<the python function to be called>,
    dag=dag,
)
# define a task with EmailOperator
task3 = EmailOperator(
    task_id='mail_task',
    to='recipient@example.com',
    subject='Airflow Email Operator example',
    html_content='<p>This is a test email sent from Airflow.</p>',
    dag=dag,
)
Task Pipeline
- Finally, the task pipeline specifies the dependencies between your tasks.
- Here, Task 2 depends on the result of Task 1, and this forms the last logical block of your DAG script.
- Just as shown in Declaring Dependencies above, we can use upstream and downstream to define the pipeline
# task pipeline
task1 >> task2 >> task3

# ___  OR ____
task1.set_downstream(task2)
task3.set_upstream(task2)
Your new DAG has been created, but it hasn’t yet been deployed. To that end, Airflow Scheduler is designed to run as a persistent service within the Airflow production environment.
DAG Runs
This is not a specific step of creating a DAG pipeline, but its part of creating a DAG. Crontab is covered in more details in Shell - Bash/Basics page.
As part of the DAG we have to understand a DAG Run which is an object representing an instantiation of the DAG in time,
Each DAG may or may not have a schedule, which informs how DAG Runs are created. schedule_interval is defined as a DAG arguments, and receives preferably a cron expression as a str, or a datetime.timedelta object. Alternatively, you can also use one of these cron “preset”:
| preset | meaning | cron |
|---|---|---|
None |
Don’t schedule, use for exclusively “externally triggered” DAGs | |
@once |
Schedule once and only once | |
@hourly |
Run once an hour at the beginning of the hour | 0 * * * * |
@daily |
Run once a day at midnight | 0 0 * * * |
@weekly |
Run once a week at midnight on Sunday morning | 0 0 * * 0 |
@monthly |
Run once a month at midnight of the first day of the month | 0 0 1 * * |
@yearly |
Run once a year at midnight of January 1 | 0 0 1 1 * |
Note: Use schedule_interval=None and not schedule_interval='None' when you don’t want to schedule your DAG.
Your DAG will be instantiated for each schedule, while creating a DAG Run entry for each schedule.
DAG runs have a state associated to them (running, failed, success) and informs the scheduler on which set of schedules should be evaluated for task submissions. Without the metadata at the DAG run level, the Airflow scheduler would have much more work to do in order to figure out what tasks should be triggered and come to a crawl. It might also create undesired processing when changing the shape of your DAG, by say adding in new tasks.
Deploy DAG
Airflow loads DAGs from Python source files, which it looks for inside its configured DAG_FOLDER. It will take each file, execute it, and then load any DAG objects from that file.
This means you can define multiple DAGs per Python file, or even spread one very complex DAG across multiple Python files using imports.
Note, though, that when Airflow comes to load DAGs from a Python file, it will only pull any objects at the top level that are a DAG instance. For example, take this DAG file:
- While both DAG constructors get called when the file is accessed,
- only
dag_1is at the top level (in theglobals()), and so only it is added to Airflow dag_2is not loaded.
dag_1 = DAG('this_dag_will_be_discovered')

def my_function():
    dag_2 = DAG('but_this_dag_will_not')

my_function()
DAG Assignment
Note that every single Operator/Task must be assigned to a DAG in order to run. Airflow has several ways of calculating the DAG without you passing it explicitly:
- If you declare your Operator inside a
with DAGblock - If you declare your Operator inside a
@dagdecorator - If you put your Operator upstream or downstream of an Operator that has a DAG
Otherwise, you must pass it into each Operator with dag=
Branching
You can make use of branching in order to tell the DAG not to run all dependent tasks, but instead to pick and choose one or more paths to go down. This is where the @task.branch decorator come in.
The @task.branch decorator is much like @task, except that it expects the decorated function to return an ID to a task (or a list of IDs). The specified task is followed, while all other paths are skipped. It can also return None to skip all downstream tasks.
The task_id returned by the Python function has to reference a task directly downstream from the @task.branch decorated task.
When a Task is downstream of both the branching operator and downstream of one or more of the selected tasks, it will not be skipped

UI
The Airflow UI makes it easy to monitor and troubleshoot your data pipelines. Here’s a quick overview of some of the features and visualizations you can find in the Airflow UI.
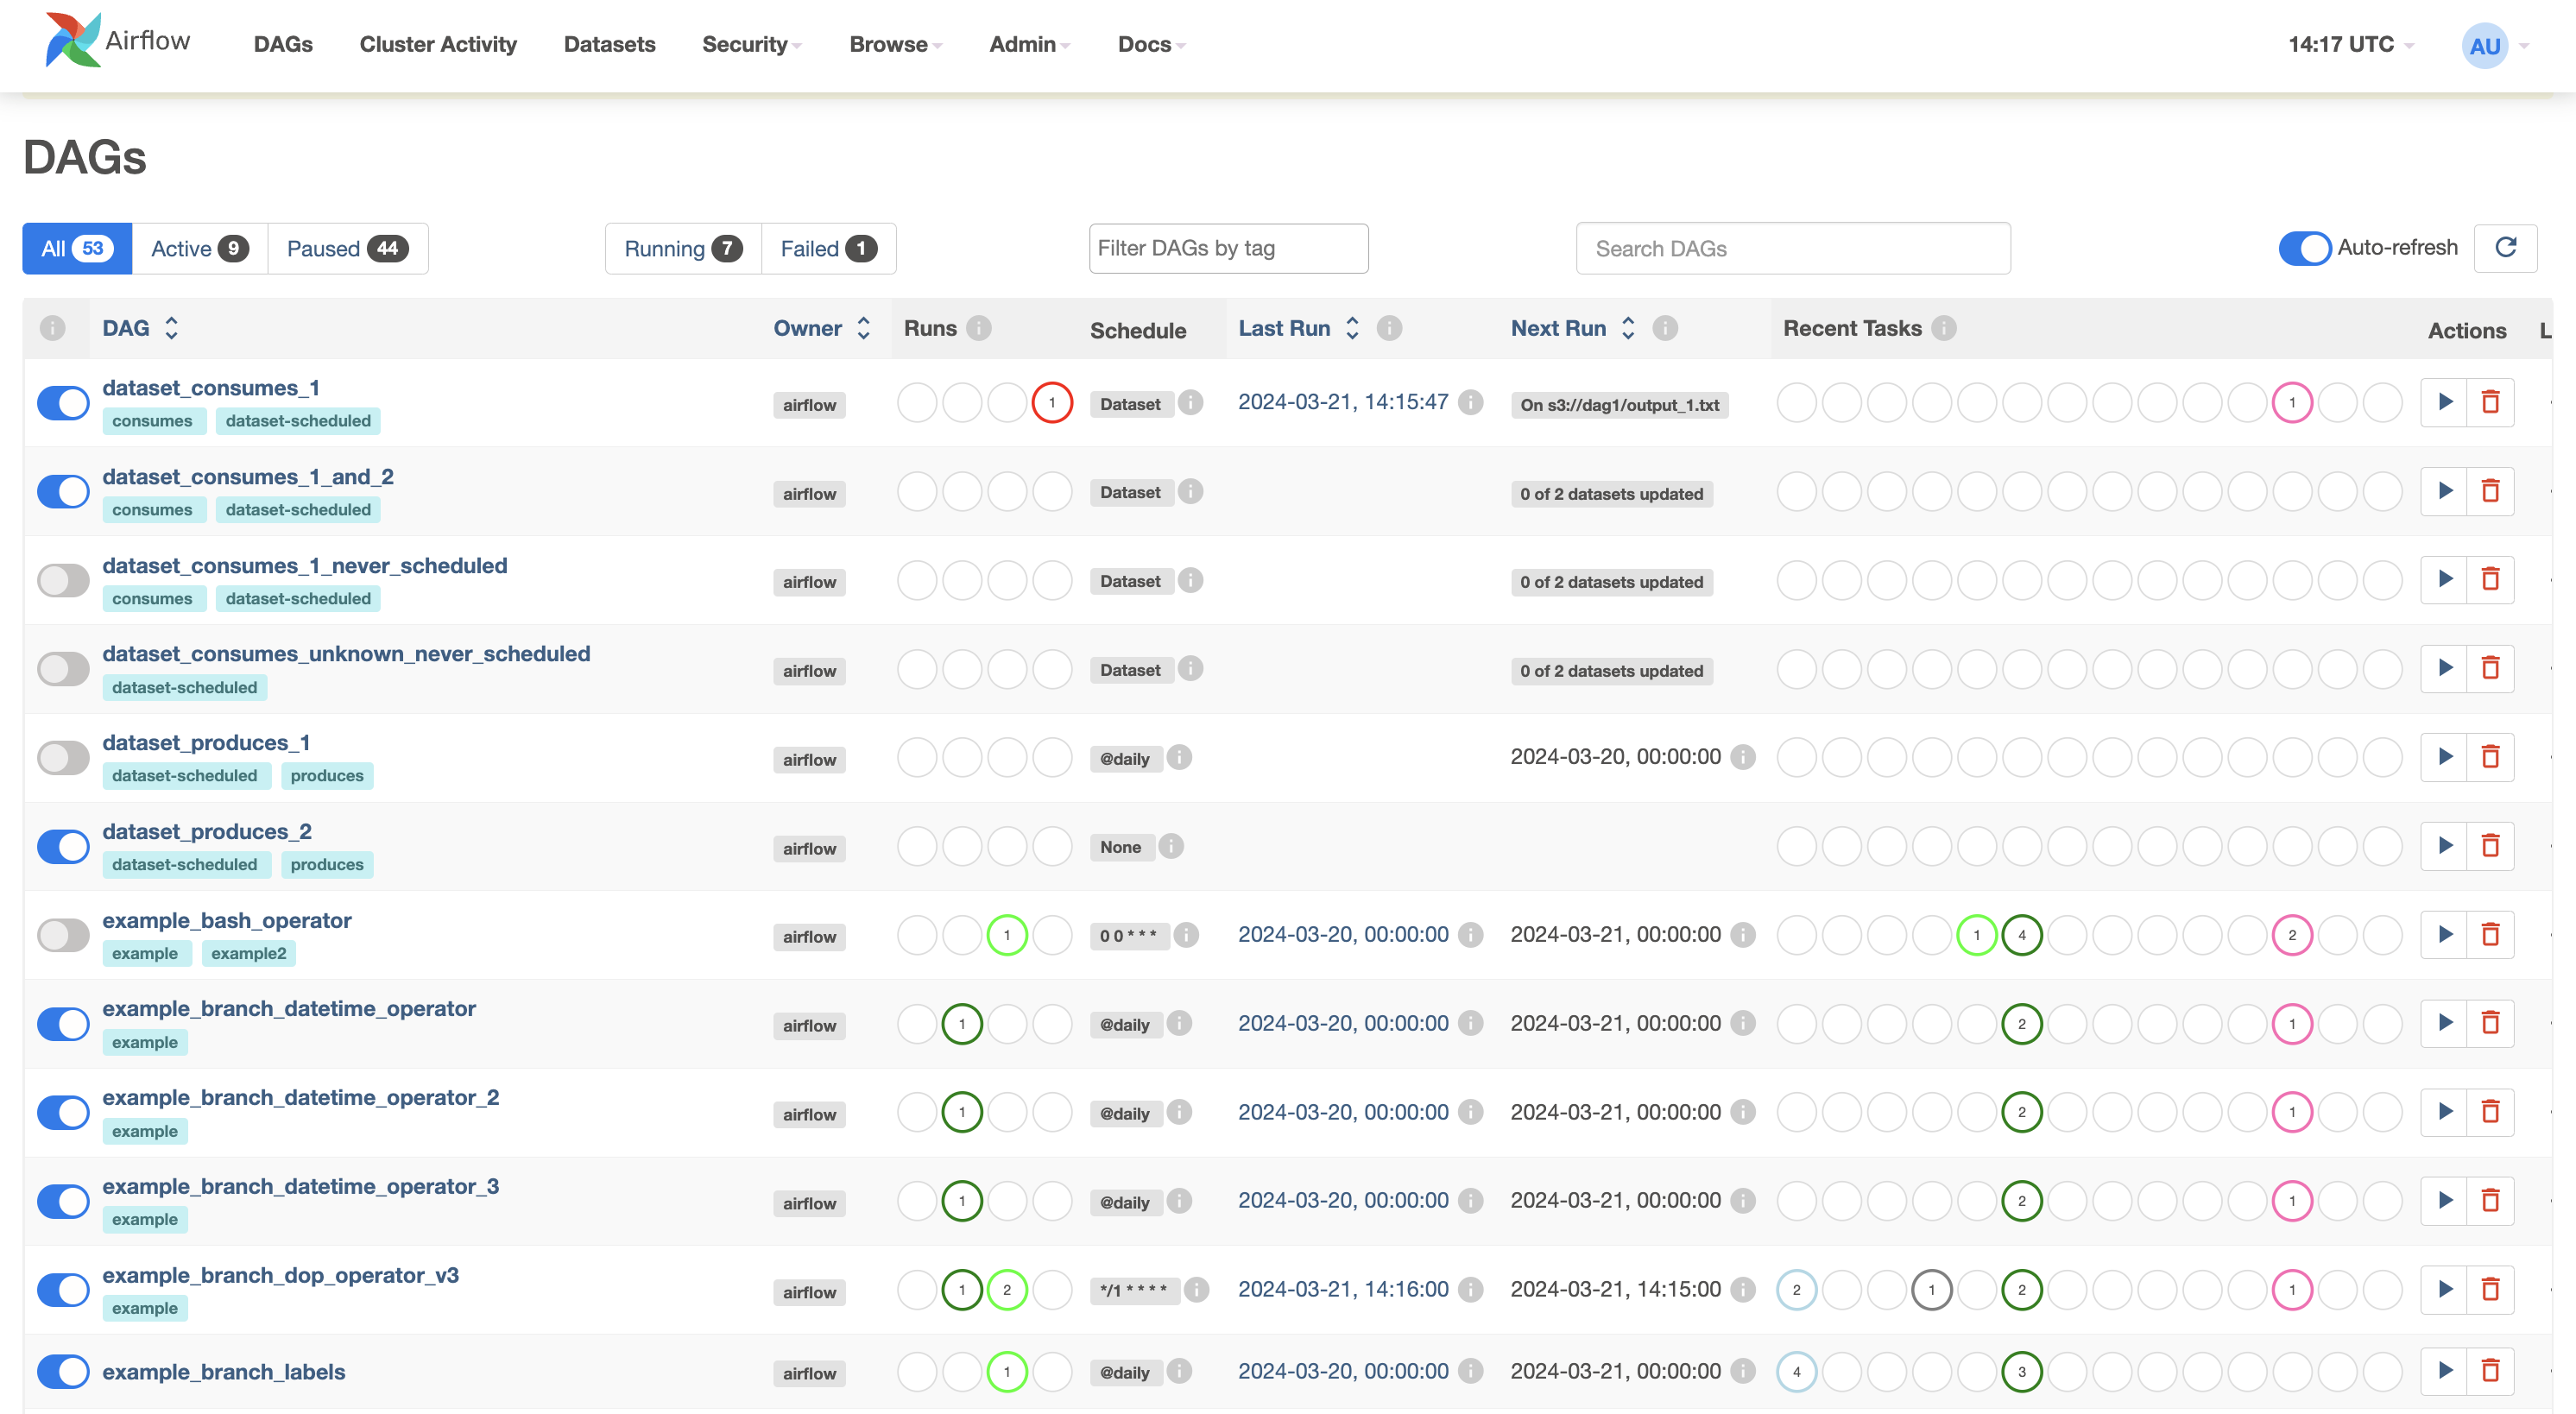
DAGs View
The landing page (shown above) for the Apache Airflow user interface. The image on the screen is how the interface appears in your browser. It defaults to the DAGs view,
- A table containing data about each DAG in your environment.
- Each row displays interactive information about a DAG in your environment, such as the DAG’s name,
- the DAG’s owner, which is set to Airflow, indicating this is a built-in example from Airflow
- the status of the tasks from the current or most recent DAG run
- the DAG’s run schedule, which in this case, will be in the crontab format
- the status of all previous DAG runs
- date and time of the last run
- date and time of the next scheduled run
- a collection of quick links to drill down into more information related to the DAG.
- The first toggle column, you can toggle to pause/unpause a DAG
- Example_bash_operator DAG is running, but all other DAGs are currently paused.
Grid View
You can visualize DAGs in several ways.
- Start by selecting the name of the DAG you want to visualize.
- Let’s consider the DAG named example_bash_operator.
- Notice that the button is on, indicating that the DAG is running in the production environment.
- When you select the DAG name, the DAG’s grid view opens.
- It shows a timeline of the status of your DAG and its tasks for each run.
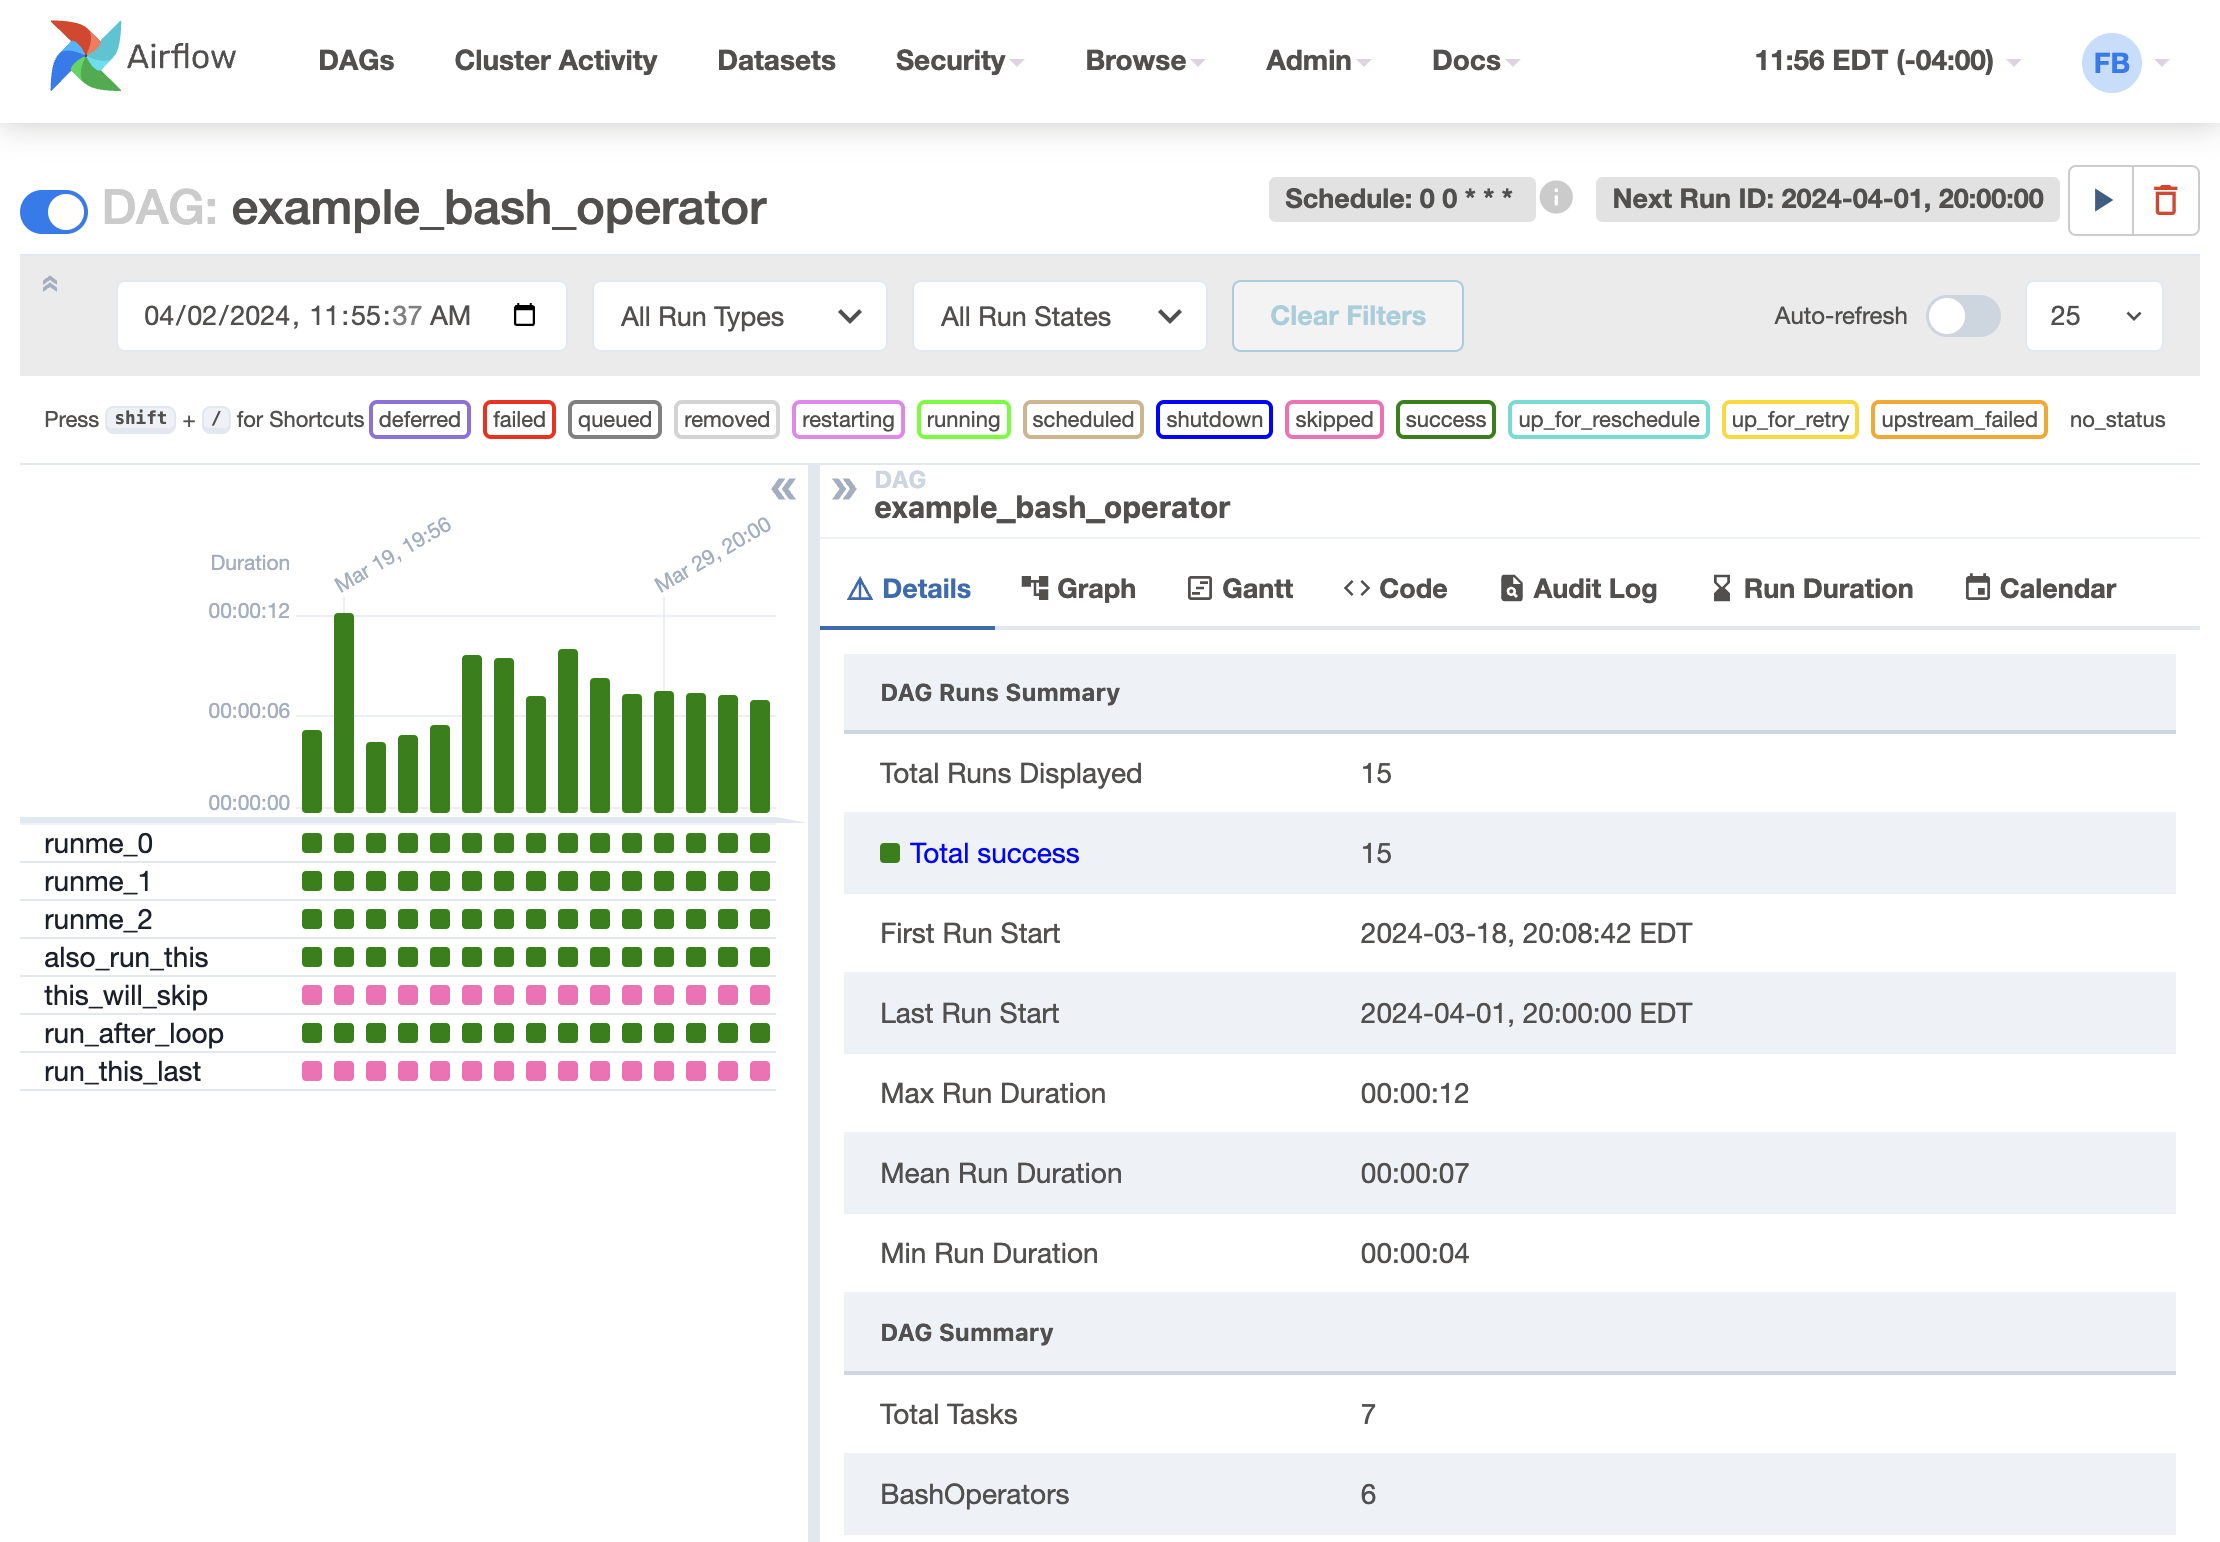
- Here, you can select the base date and the number of runs to display
- Each status is color-coded according to the legend displayed up above
- You can also hover your mouse pointer over any task in the timeline to view more information about it.
Next, let’s review the elements of a multi-operator DAG.
Graph
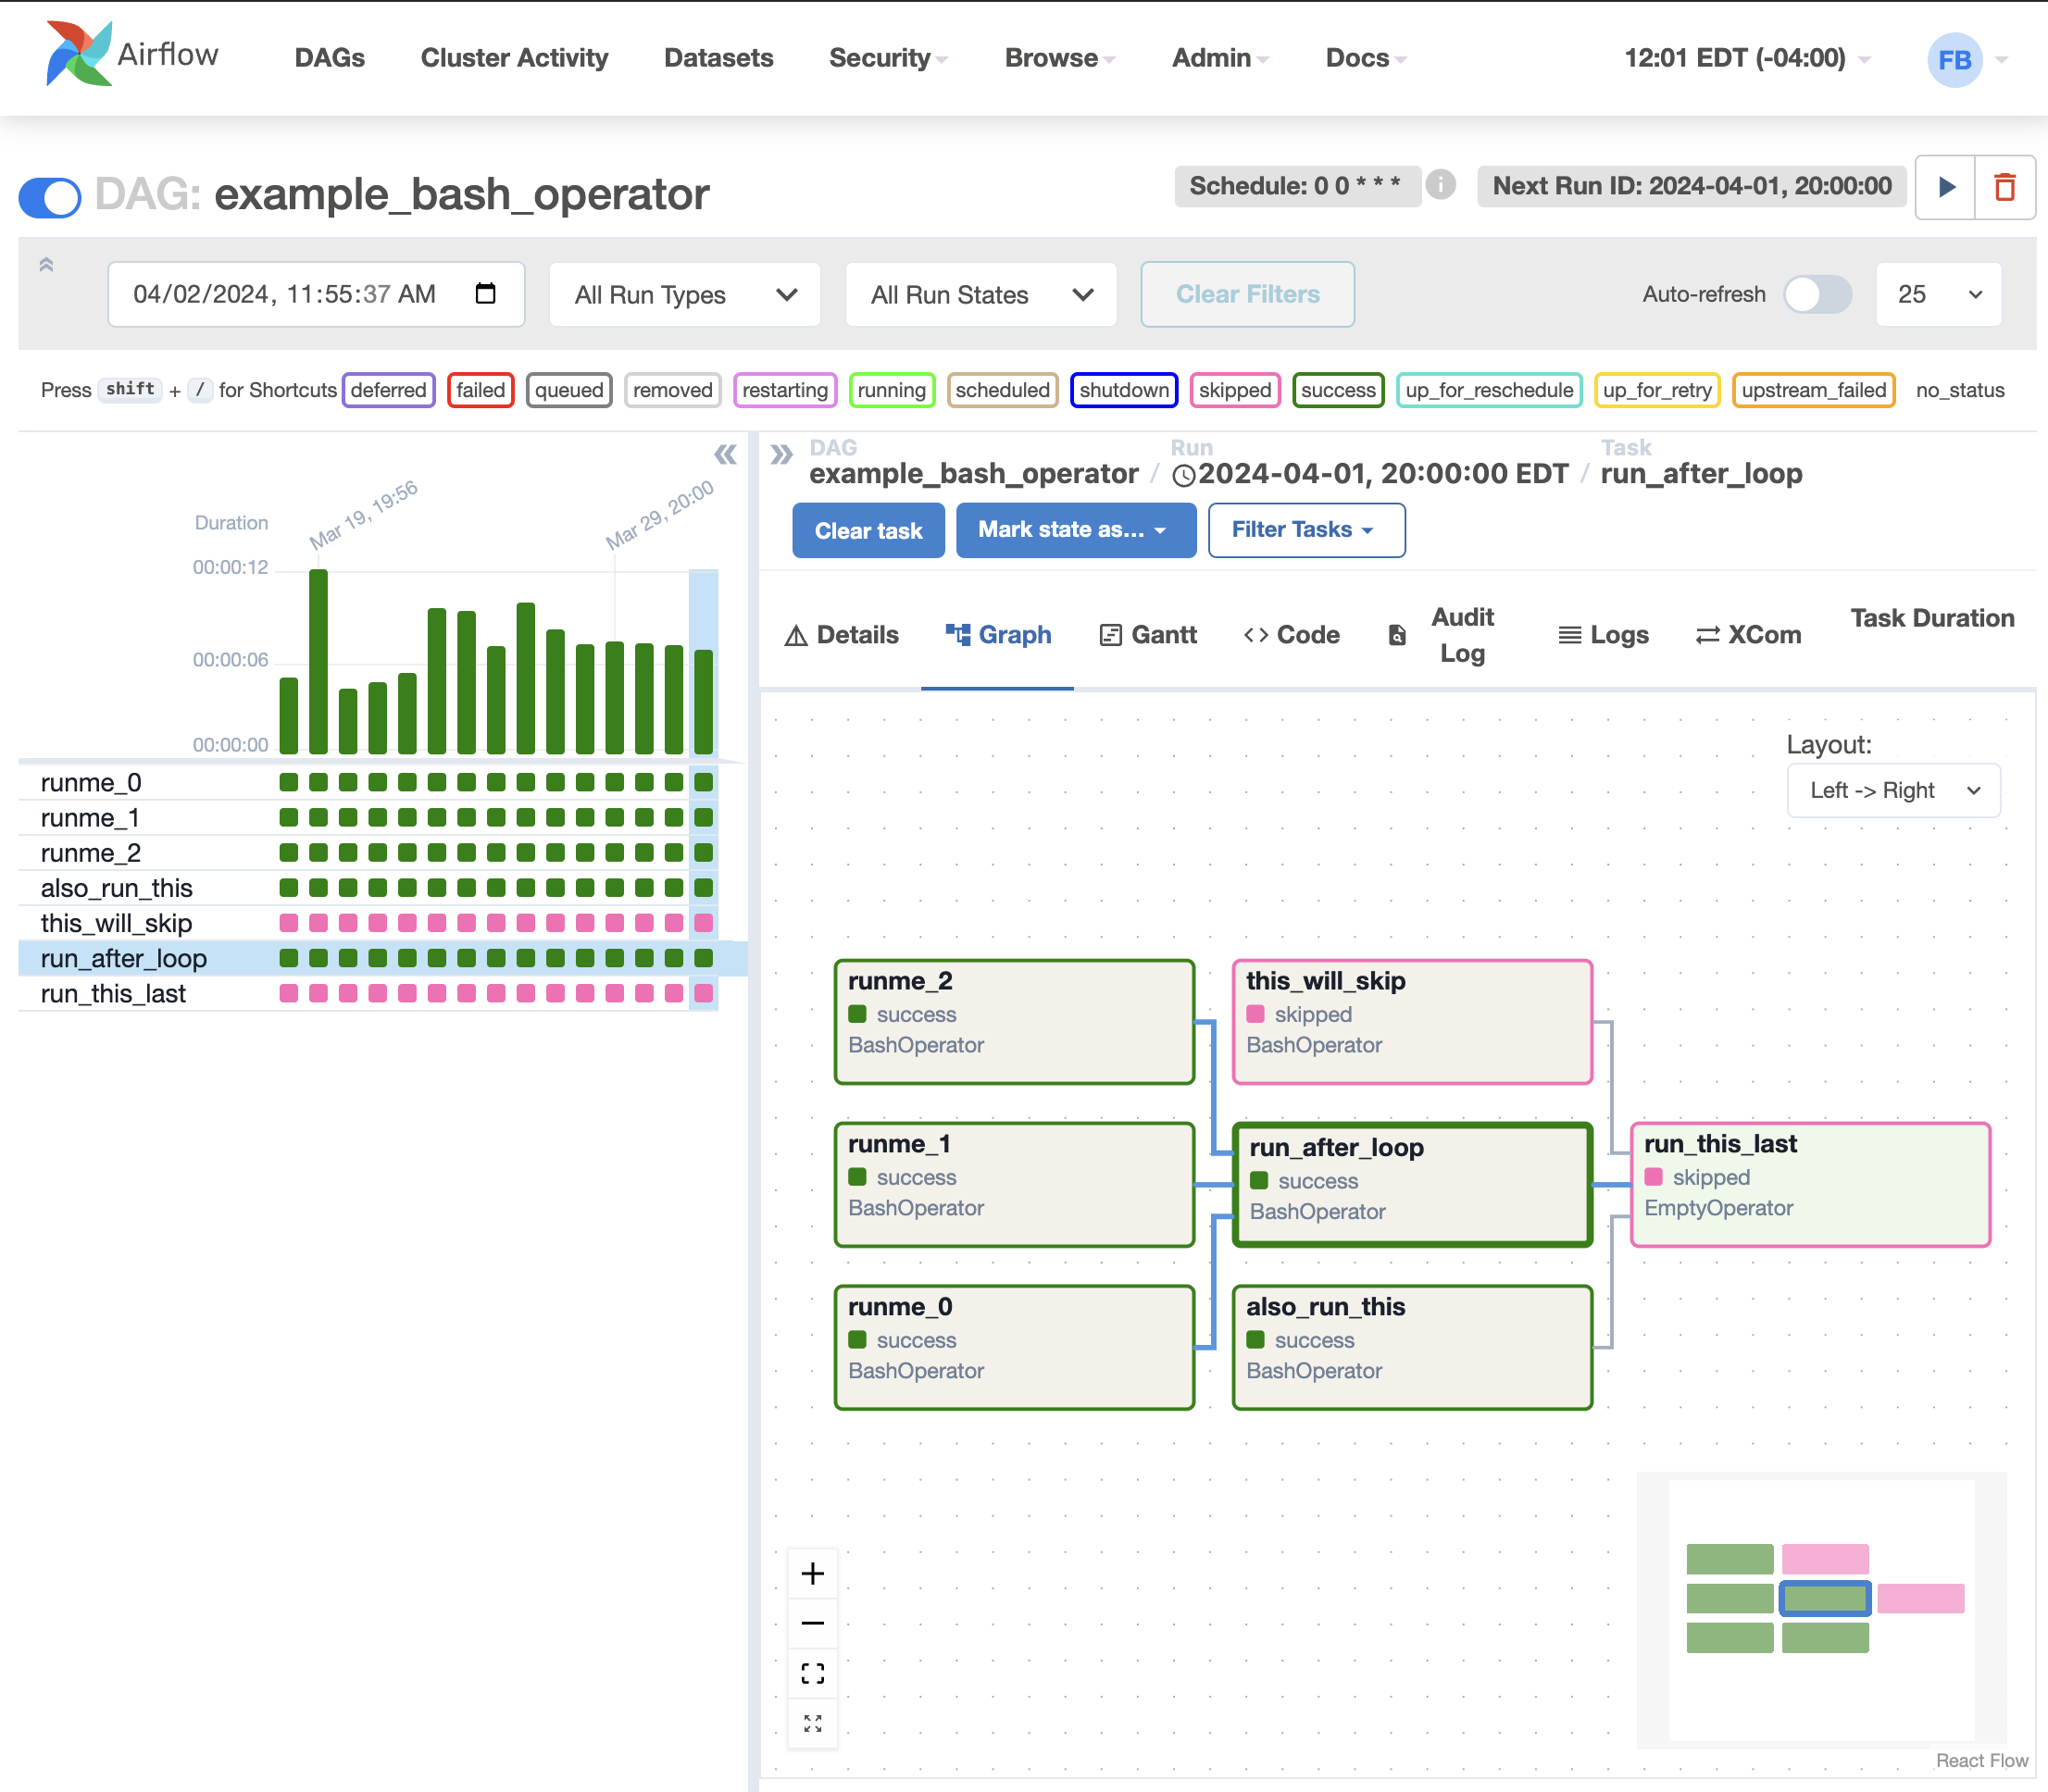
The graph view is perhaps the most comprehensive. Visualize your DAG’s dependencies and their current status for a specific run.
- You can see the DAG’s tasks and dependencies.
- Each task is color-coded by its operator type.
- Here, you can filter your view by toggling the status option buttons.
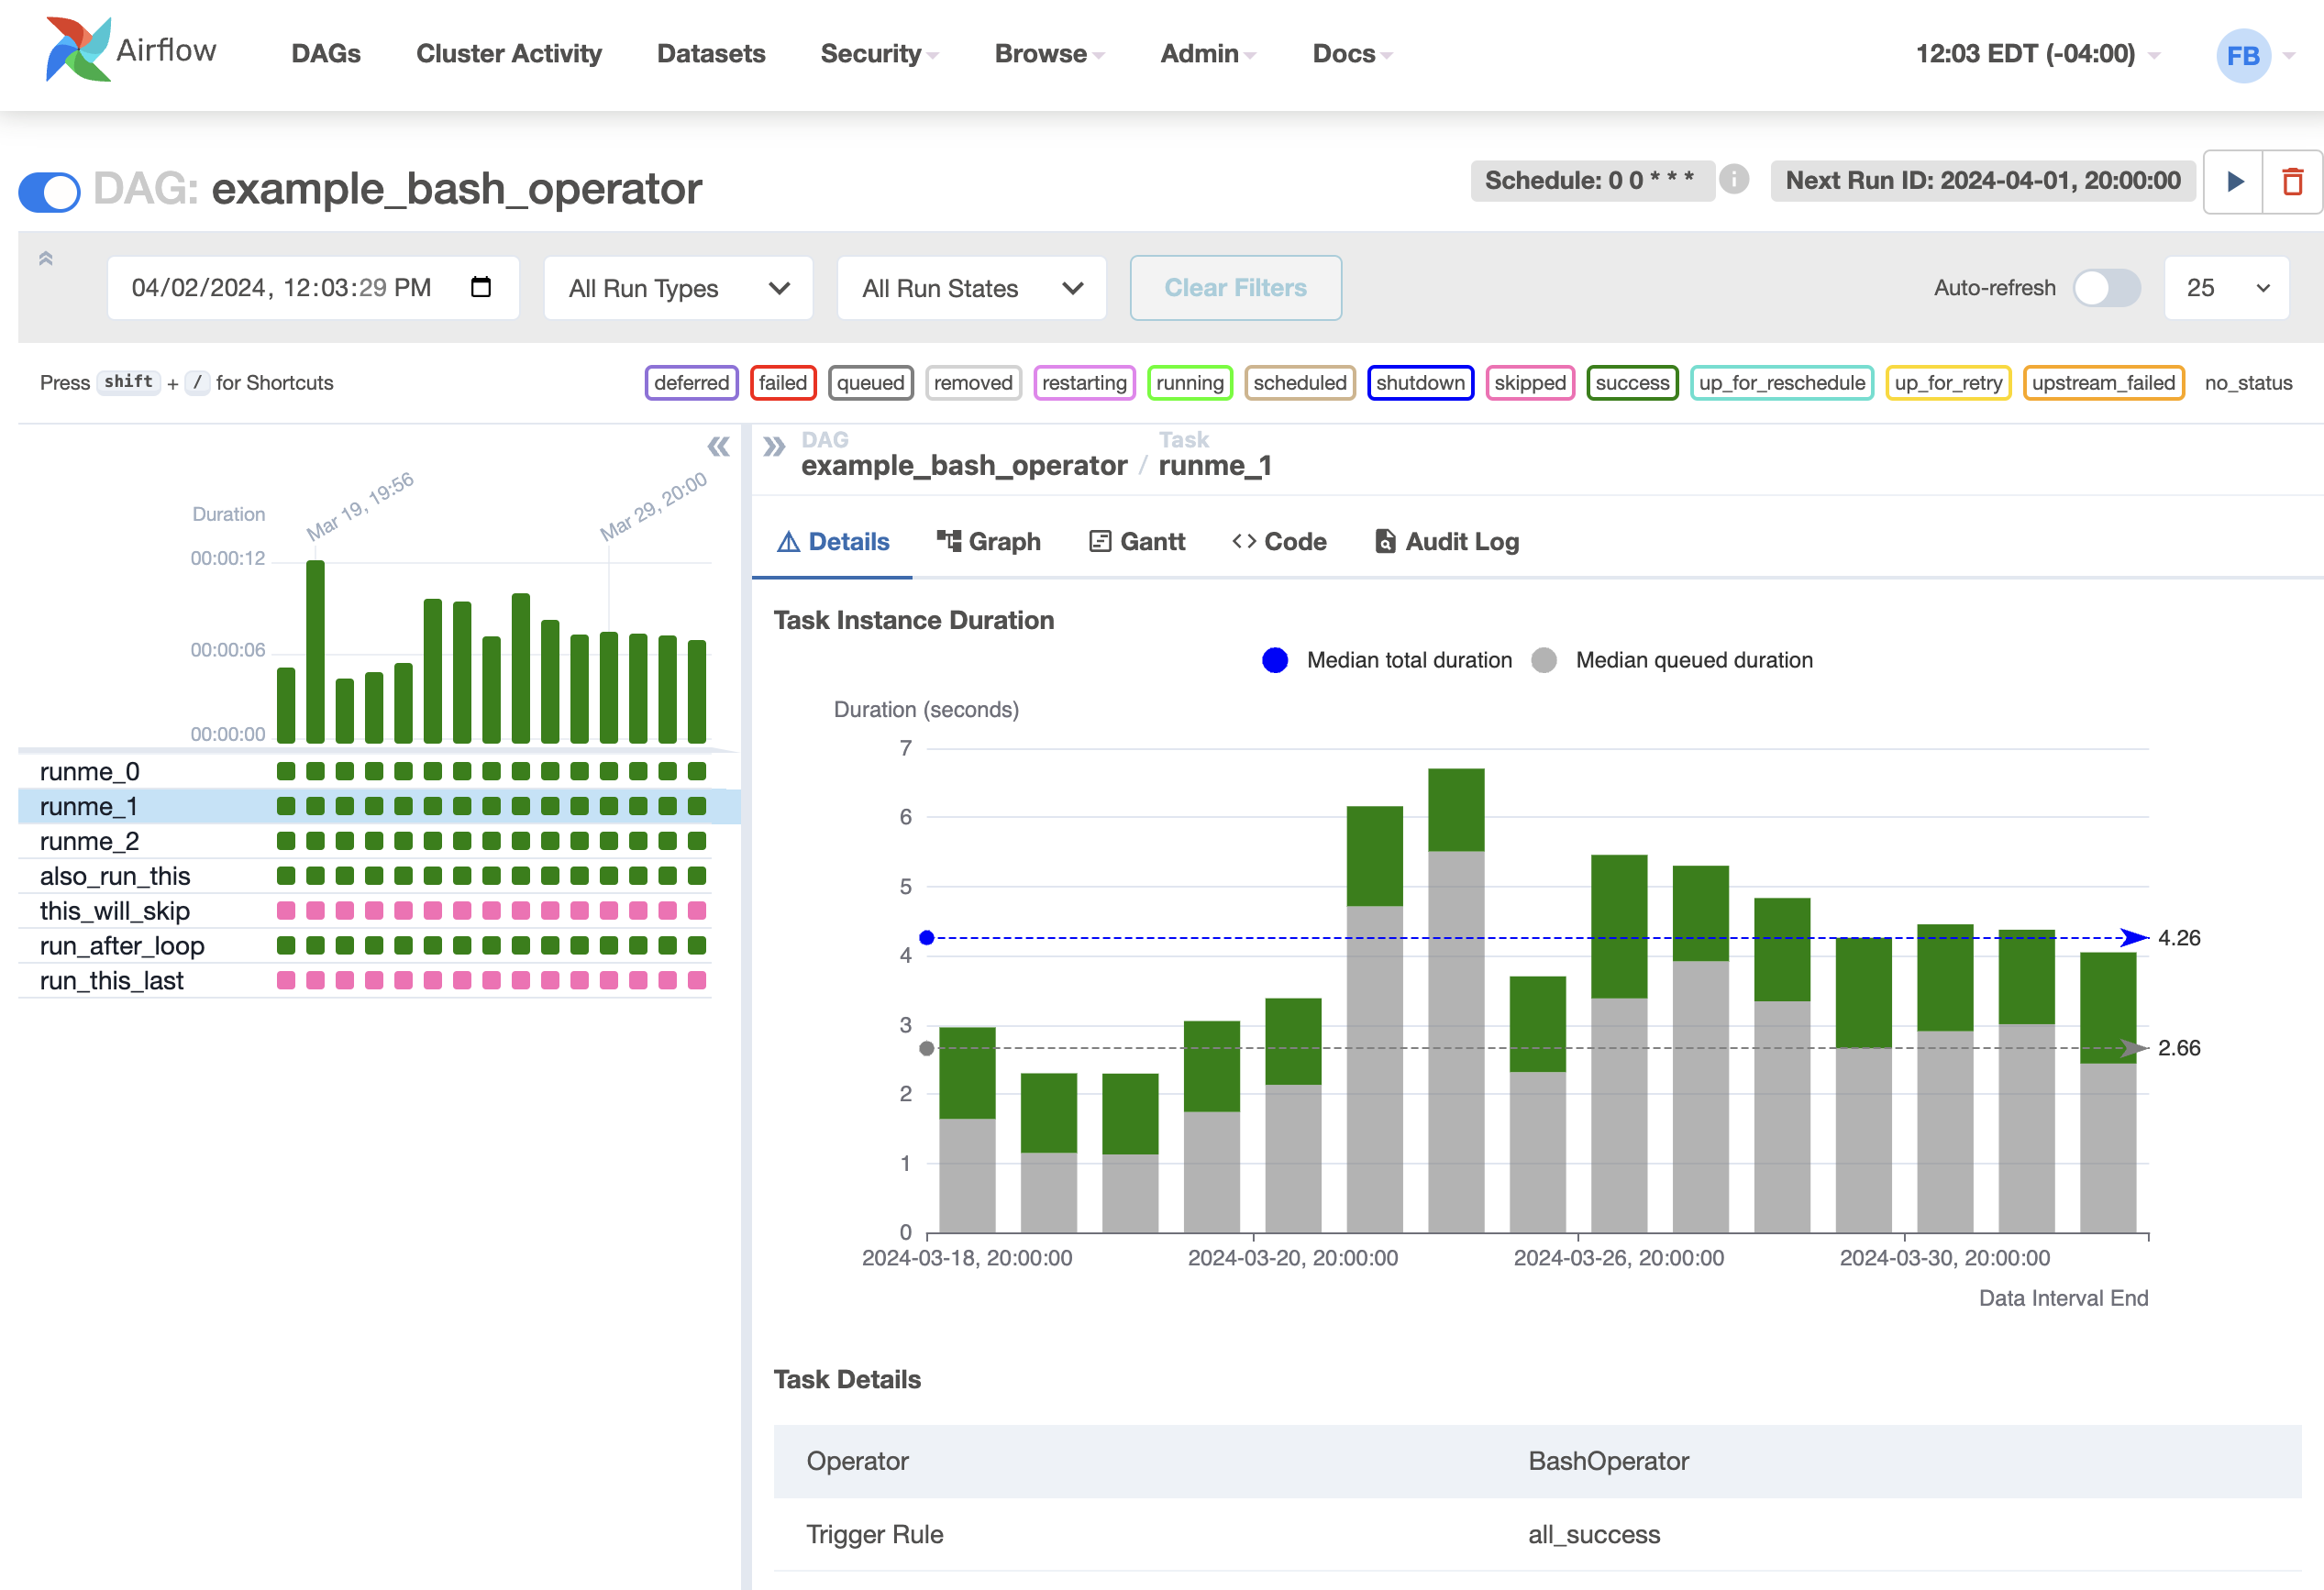
Duration
By clicking on “Task duration”, you can view a timeline chart of your DAG’s task durations to see how they have been performing.
AA Deployment
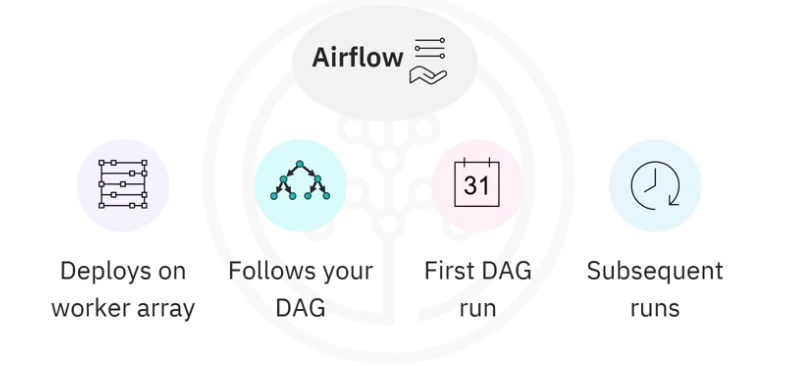
Apache Airflow Scheduler can be used to deploy your workflow on an array of workers. It follows the tasks and dependencies that you specified in your DAG.
Once you start an Airflow Scheduler instance, your DAGs will start running based on the start date you specified as code in each of your DAGs.
After that, the scheduler triggers each subsequent DAG run according to the schedule interval that you specified.
One of the key advantages of Apache Airflow’s approach to representing data pipelines as DAGs is the fact that they are expressed as code. When workflows are defined as code, they become more
- Maintainable; developers can follow explicitly what has been specified by reading the code.
- Versionable; code revisions can easily be tracked by a version control system, such as Git.
- Collaborative; teams of developers can easily collaborate on both development and maintenance
- of the code for the entire workflow.
- Testable; any revisions can be passed through unit tests to ensure the code still works as intended.
Example
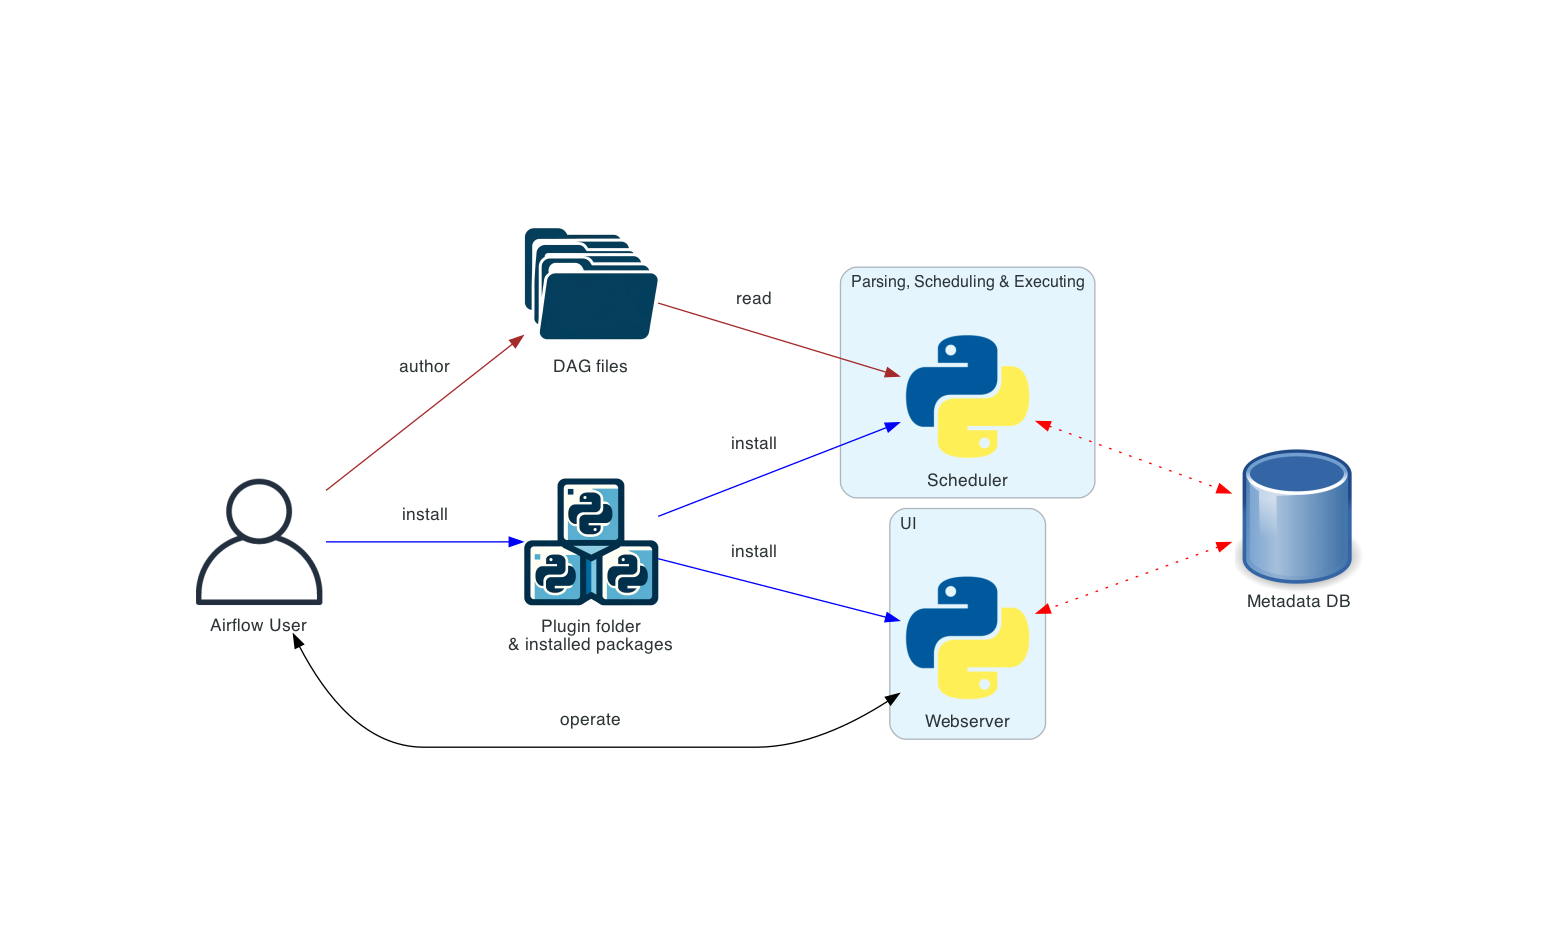
The diagram below shows how to deploy Apache Airflow in a simple one machine and single person deployment. More complex examples can be found at AA documentation page.
The meaning of the different connection types in the diagrams below is as follows:
- brown solid lines represent DAG files submission and synchronization
- blue solid lines represent deploying and accessing installed packages and plugins
- black dashed lines represent control flow of workers by the scheduler (via executor)
- black solid lines represent accessing the UI to manage execution of the workflows
- red dashed lines represent accessing the metadata database by all components
Basic Deployment
This is the simplest deployment of Airflow, usually operated and managed on a single machine. Such a deployment usually uses the LocalExecutor, where the scheduler and the workers are in the same Python process and the DAG files are read directly from the local filesystem by the scheduler. The webserver runs on the same machine as the scheduler. There is no triggerer component, which means that task deferral is not possible.
Such an installation typically does not separate user roles - deployment, configuration, operation, authoring and maintenance are all done by the same person and there are no security perimeters between the components.
Logging & Monitoring
Since data pipelines are generally run without any manual supervision, observability is critical.
Airflow has support for multiple logging mechanisms, as well as a built-in mechanism to emit metrics for gathering, processing, and visualization in other downstream systems. The logging capabilities are critical for diagnosis of problems which may occur in the process of running data pipelines.
Architecture
Airflow supports a variety of logging and monitoring mechanisms as shown below.
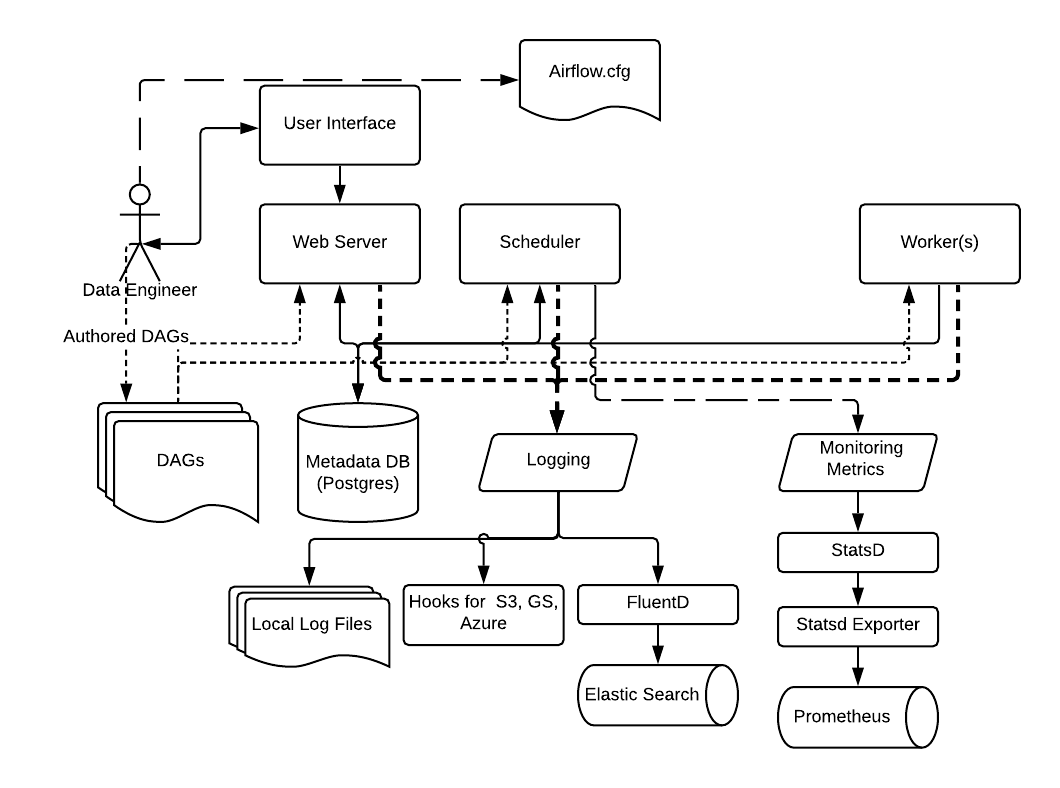
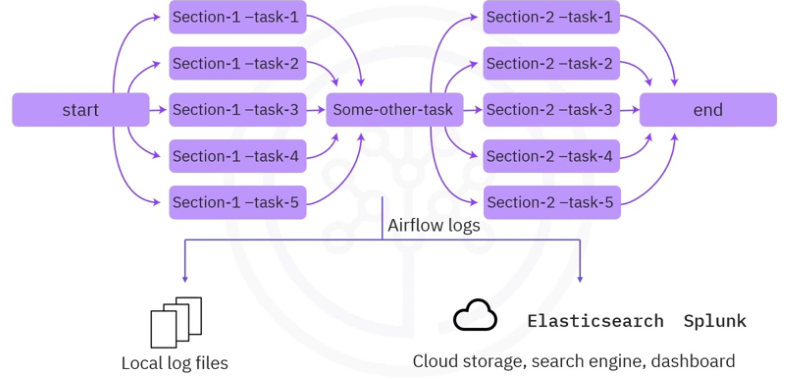
Logs
- By default, Airflow logs are saved to local file systems as log files. This makes it convenient for developers to quickly review the log files, especially in a development environment.
- For Airflow production deployments, the log files can be sent to cloud storage such as IBM Cloud, AWS, or Azure for remote accessing.
- The log files can also be sent to search engines and dashboards for further retrieval and analysis.
- Airflow recommends using Elasticsearch and Splunk, which are two popular document database and search engines to index, search, and analyze log files.
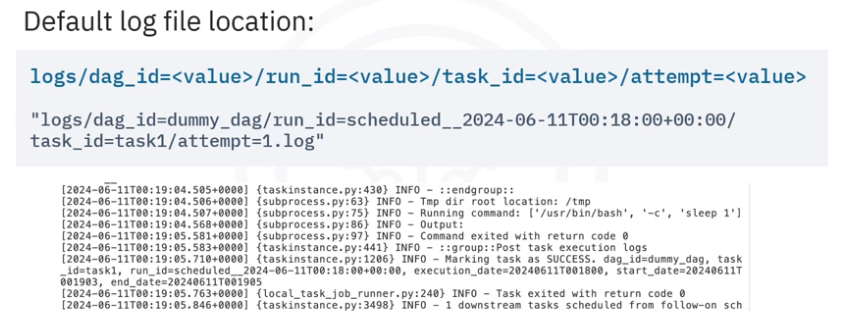
Naming
- By default, log files are organized by
- dag_ids
- run_ids
- task_ids
- attempt numbers
- You will need to navigate to a specific log file for a task execution using the path convention.
For example, if you want to find the log for the first attempt of task1 in dummy_dag at a specific time:
- You will need to navigate to
- logs/dag_id=dummy_dag/run_id=scheduled_time/task_id=task1/attempt=1.log in the file editor.
- Note, the run_id value depends on how the DAG was executed
- It can either be manual or scheduled, followed by the time of execution
In the log file, you can view information such as
- the running command
- command result
- task result, and so on.
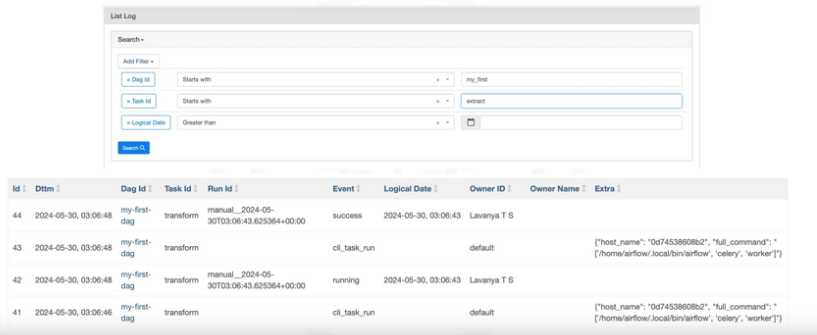
You can also quickly review the task events via UI provided by the Airflow web server.
- You can search events with fields like Dag id, Task id, and Logical Date, and quickly get an overview of the specific DAGs and tasks you are looking for.
Metrics
Airflow produces three different types of metrics for checking and monitoring component’s health, these are
- counters : metrics that will always be increasing, such as the total counts of successful or failed tasks.
- gauges : metrics that may fluctuate, for example, the number of currently running tasks or DAG bag sizes.
- timers : metrics related to time duration, for instance, the time to finish a task, or the time for a task to reach success or failed state.
Production metrics
Similar to logs, the metrics produced in Airflow production deployments should be sent and analyzed by dedicated repositories and tools. Airflow recommends using
- StatsD, which is a network daemon that can gather metrics from Airflow and send them to a dedicated metrics monitoring system.
Monitoring & Analysis
For metrics monitoring and analysis, Airflow recommends using
- Prometheus, which is a popular metrics monitoring and analysis system. Prometheus can also aggregate and visualize metrics in a dashboard for a more interactive visual style.
IBM Skills Network Lab
Skills Network Labs (SN Labs) is a virtual lab environment. Upon clicking the “Launch App” button below, your Username and Email will be passed to SN Labs and will be used in strict accordance with IBM Skills Network Privacy policy, such as for communicating important information to enhance your learning experience. us: airflow NjQ0NC1lbWhyY2Yt
- Log in to SNL
- Under BIG DATA > Apache Airflow > Start
- Open AA Web UI
- Practice browsing around looking for the views listed above
CLI
List DAGs
AA offers a CLI, use it to list all the existing DAGS
airflow dags list

# __ OR just list all the tasks associated with ONE named DAG: example_bash_operator
airflow tasks list example_bash_operator

# OUTPUT
. also_run_this
run_after_loop
run_this_last
runme_0
runme_1
runme_2
this_will_skip
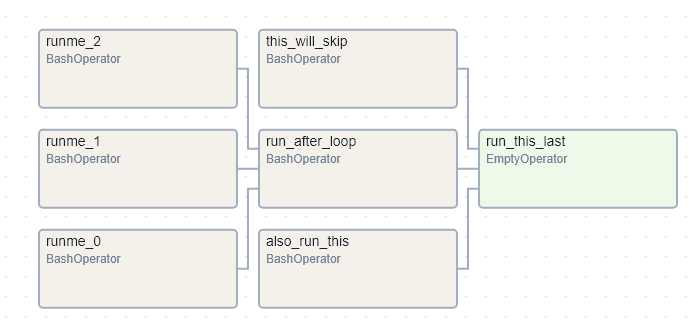
You can verify the above information by using the Grid View > Click on the named DAG > Graph and you get:
Un/pause
# ___ Unpause a DAG
airflow dags unpause example_branch_operator

#___  Pause a DAG
airflow dags pause tutorial